Using Arduino to Operate the MN52H-C40 Bluetooth Module: Implementing Bluetooth Beacon Functionality
[TAIWAN, 24th Dec. 2024]
Introduction
In our previous exercise, we explored how to set up and program the Nordic nRF52 series chip using the Arduino IDE, successfully running the Arduino environment on the MN52H-C40 module. This time, we will delve deeper into utilizing these techniques to implement Bluetooth Beacon functionality. Bluetooth Beacon is a low-power wireless technology widely used in location services, asset tracking, and Internet of Things (IoT) devices. This demonstration will show you how to configure and program the MN52H-C40 module to function as a Bluetooth Beacon, thereby expanding your development projects and application scope. Whether you are a beginner or an experienced developer, this article will provide practical steps and tips to help you get started quickly.
Step 1: Arad connectivity MN52H-C40 Arduino design process demonstrating
1.1 Hardware cabling demonstration
1.1.1 Cable setting chart

1.1.2 Cabling layout

1.2 Setup Arduino IDE
1.2.1 Run Arduino IDE:


1.2.2 Board library package select


1.2.3 Click on “LIBRARY MANAGER”

1.2.3.1 Install “Adafruit nRFCrypto”
Search “Adafruit nRFCrypto” and install.

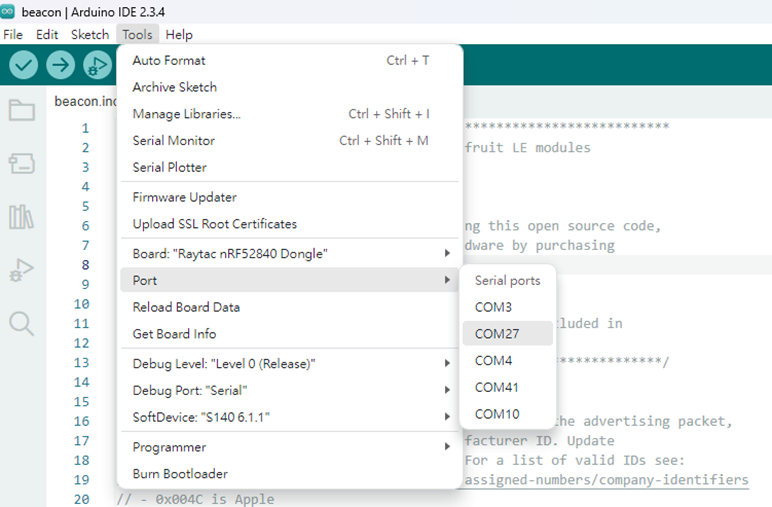
1.2.4 Setup COM PORT for example upload
Step 2: MN52H-C40 BLE beacon advertising trial
2.1 Run beacon example:
File->Examples->Adarfuit Bluefruit Nrf52 Librarys->Peripheral->beacon

2.2 Compile example:
Click Sketch-> Verify / Compile
Compile complete IDE shows the message as below:
“Library Adafruit nRFCrypto has been declared precompiled:”

2.3. Flash “beacon example executable file” to MN52H-C40 EVB
Click on Sketch -> Upload
Upload the successful message shown below.

Step 3: MN52H-C40 beacon advertising demonstration
3.1 Use the beacon scanner board of Arad connectivity (PN: BN52H-C40) to capture the beacon advertising packets of MN52H-M EVB.
3.1.1 Hardware Setting Chart

3.1.2 Cable Layout

3.2 Environment setup of a personal computer
3.2.1 Run Tera Term VT: set up the COM port of the beacon scanner board.


3.2.2 Pairing MN52H-C40 MAC address to BN52H-C40 beacon scanner.
3.3 Trial start and result
3.3.1 Power on MN52H-C40 EVB
3.3.2 Power on BN52H-C40
3.3.3 Data capture result as below.

3.3.4 Confirm the sent information is matched.
The sent information is matched to the received information, confirming that the beacon communication is complete.

Conclusion
The above instructions provide a general overview of how to integrate the Arduino IDE with the MN52H-40 BLE EVB for program development. Depending on their specific application scenarios, readers can further utilize example scripts available in the Arduino IDE for secondary development, thereby shortening the development time.
Edited by Intl. Commercial Development Manager: Mr. Tim Chien
Technical guidance provided by R&D Manager: Mr. Venson Laio